AUD/USD (6A) — consolidating after fresh catalyst in normal regime
Market consensus shifted from aggressive bullish expecting continued RBA tightening to cautious neutral recognizing May 5 hike created conflicting narrative with RBA's own growth slowdown warning tempering conviction for sustained policy divergence

Market consensus shifted from aggressive bullish expecting continued RBA tightening to cautious neutral recognizing May 5 hike created conflicting narrative with RBA's own growth slowdown warning tempering conviction for sustained policy divergence
RBA delivered third consecutive 25bp hike to 4.35% on May 5 (5 days ago) but Economic agent flipped bearish at -2.5 signal citing explicit RBA warning that hike would intensify cost-of-living pressures and slow economy creating conflicting narrative versus policy divergence tailwinds
Institutional positioning surged to 78.7K net longs (up 9.5% week-over-week) confirming trend-following accumulation but now at elevated levels approaching 75th-80th percentile creating latent profit-taking vulnerability after 620bp rally from November lows
AUD trading at 4-year highs near 0.7245 on May 8 following peace deal optimism creating extended positioning combined with 2-consecutive-miss streak (NO CALL missed at +0.73%, BULLISH missed at -0.29%) requiring caution per Rule 4 Thesis Health degradation
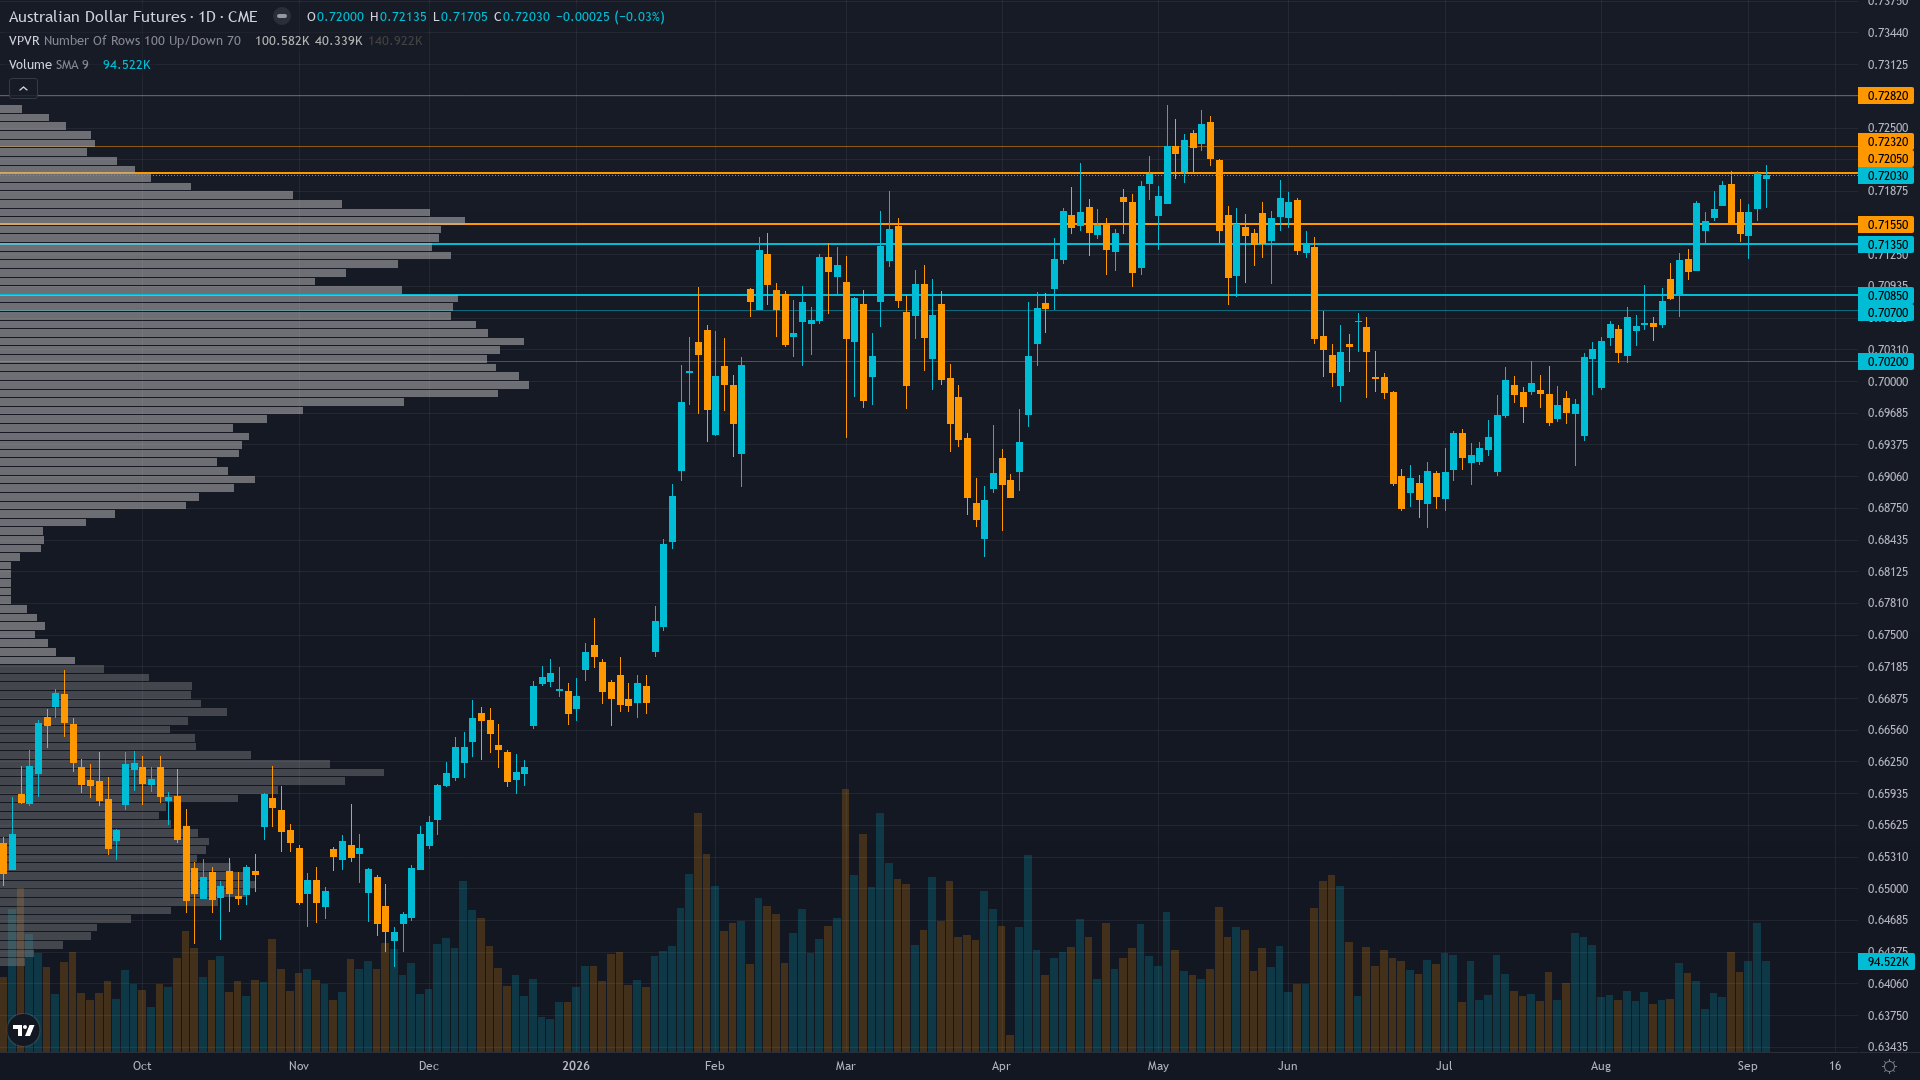
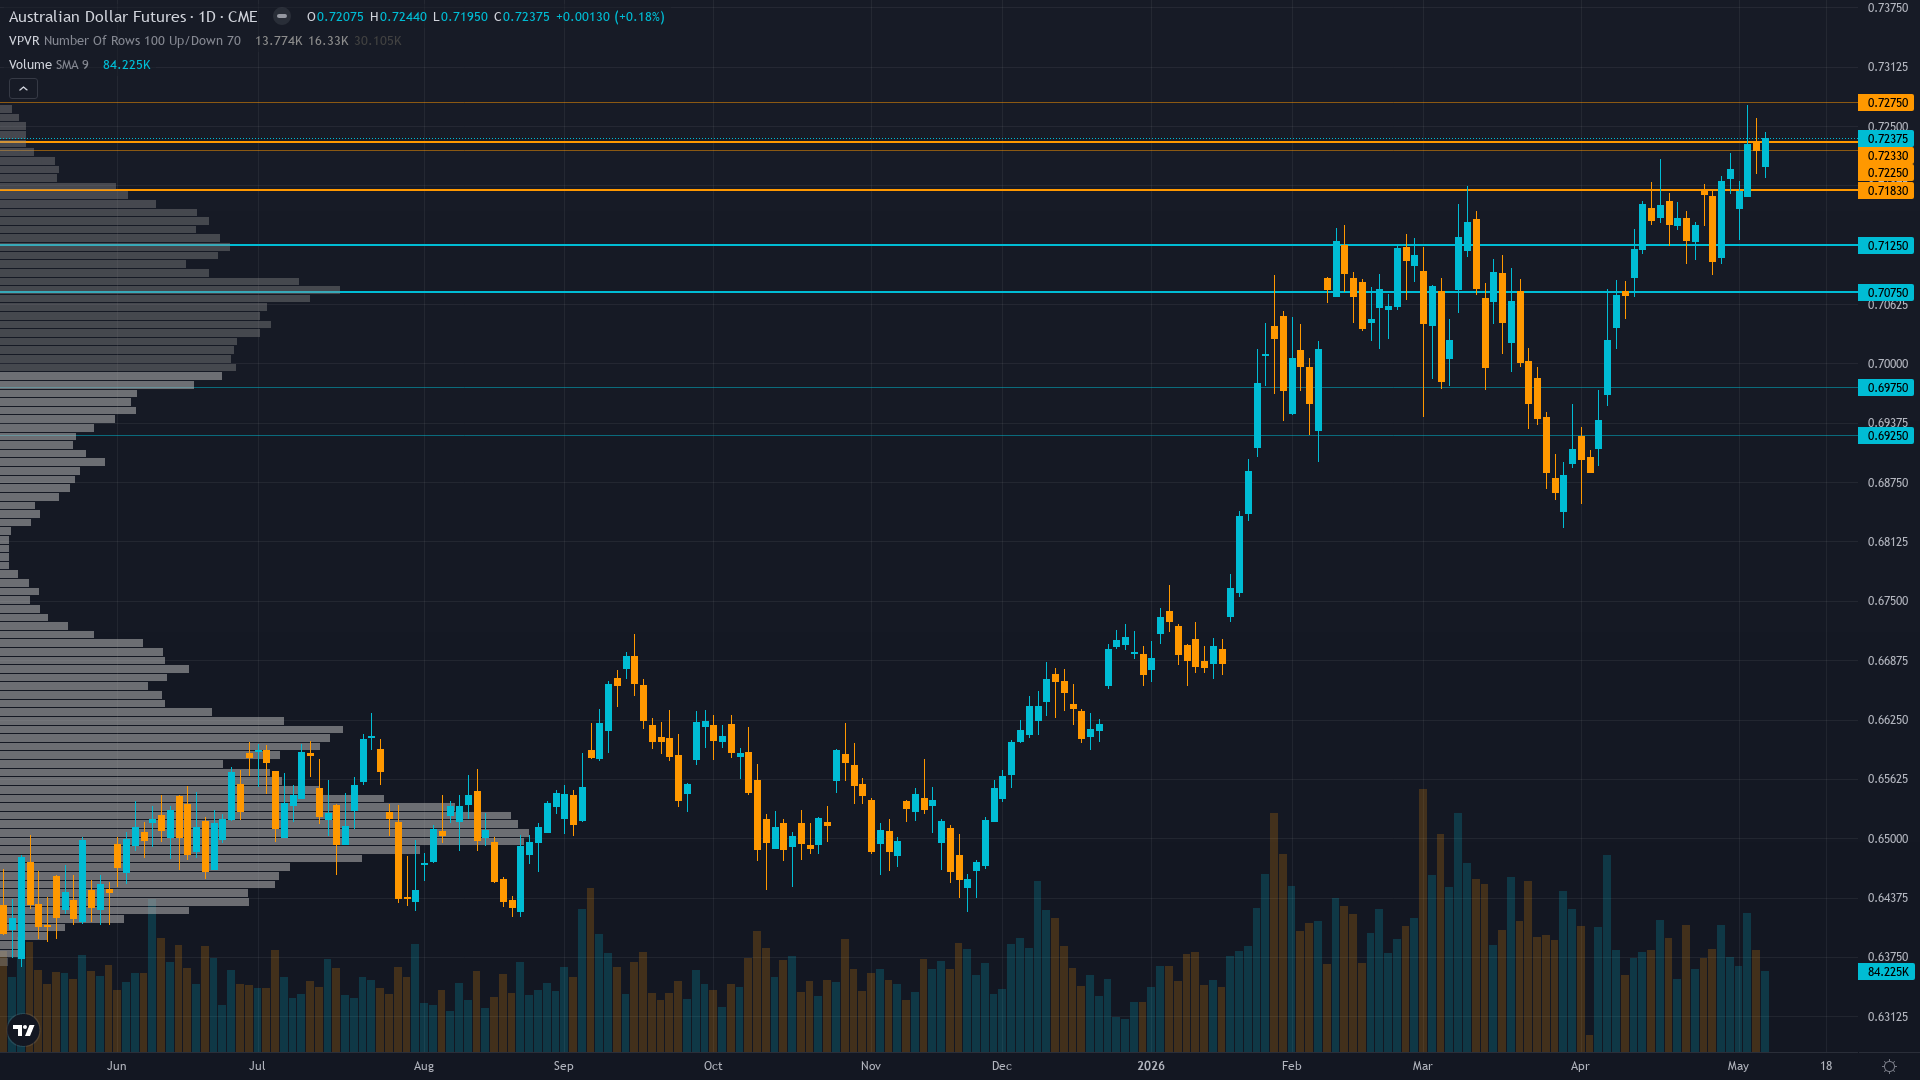
| ▼ Resistance Zone 2 | 0.7330 – 0.7370 |
| ▼ Resistance Zone 1 | 0.7275 – 0.7315 |
| ─ Pivot Area | ~0.7245 |
| ▲ Support Zone 1 | 0.7080 – 0.7120 |
| ▲ Support Zone 2 | 0.6930 – 0.6970 |
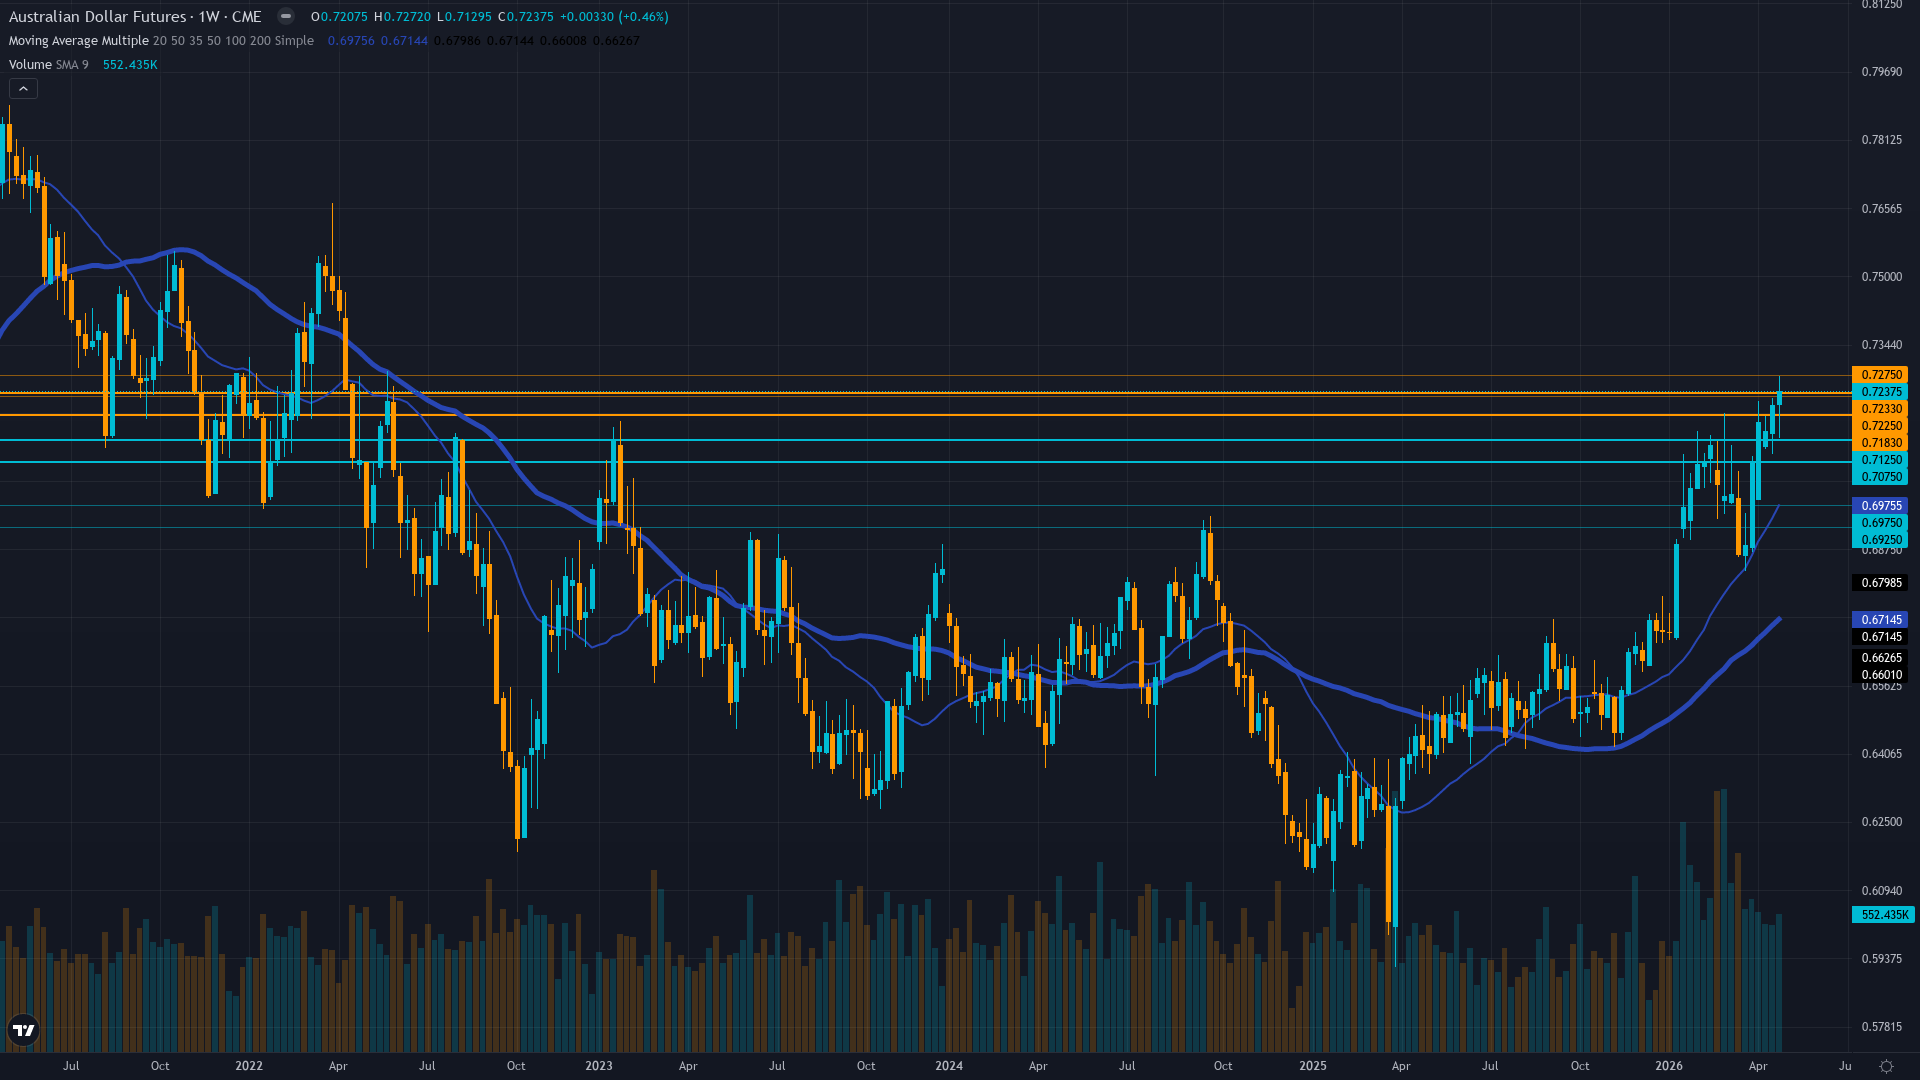
Trading at 0.7245 (4-year high May 8) above 50-day MA at 0.7198 and 200-day MA at 0.6843 in bullish alignment with RSI 53.71 neutral but immediate resistance at 0.7295-0.7320 requiring fresh catalyst for breakout
Policy divergence intact with RBA at 4.35% after May 5 hike versus Fed at 3.50-3.75% creating 60-85bp inversion but RBA explicitly warned hike would intensify cost-of-living pressures and slow economy materially contradicting bullish policy narrative
Net longs at 78.7K contracts up 9.5% from prior 71.9K representing third consecutive week of accumulation but positioning likely at 75th-80th percentile approaching elevated territory creating profit-taking risk if RBA narrative shifts dovish
Implied volatility at 9.45-10.1% slightly elevated above normal 7-9% range with mild put skew indicating defensive positioning but thin 6A options liquidity limits analytical value providing weak directional signal
RISK-ON macro regime with VIX at 17.39 on May 7 (well below 20 threshold) confirming benign volatility but Economic agent's dramatic flip to -2.5 bearish signal citing RBA's acknowledgment that May 5 hike creates growth slowdown risk despite policy divergence advantage creates fundamental conflict
Normal with short-term slightly below medium-term after normalizing from March elevated regime creating stable 60-70bp daily range environment
High volatility regimes around RBA meetings typically persist 20-30 days then revert sharply to baseline; current normalization at day 5 since May 5 RBA hike suggests stable consolidation through June 4 before potential catalyst-driven volatility expansion
Moderate 65% probability volatility continues normalizing toward 48th percentile over next 10-14 days as May RBA binary catalyst digests, expect stable 60-70bp daily ranges before potential June 4 RBA catalyst spike if policy surprise delivered
Normalizing volatility at 52nd percentile suggests 60-70bp daily ranges versus March's 100-150bp creating stable directional environment; breakout above 0.7295 or breakdown below 0.71 requires sustained follow-through in current vol regime providing clearer conviction signals
Volatility compression from March elevated regime to current 52nd percentile reduces tail risk but June 4 RBA could trigger 100-150bp move within 24-48 hours if dovish pause surprises current modest hawkish expectations or if fourth hike delivered contrary to Economic agent's bearish assessment; expect 150-200bp range through June versus 300-400bp in March geopolitical period with measured environment favoring consolidation ahead of binary RBA catalyst
|
⚠️ Primary Risk
Economic agent's bearish flip based on RBA's explicit warning that May 5 hike would intensify cost-of-living pressures and slow economy proves correct triggering June 4 dovish pause or cut from current 4.35% collapsing entire policy divergence thesis and forcing violent unwind from extended 78.7K net long positioning at 4-year highs Probability: MEDIUM
|
✦ Primary Opportunity
June 4 RBA delivers fourth consecutive hike to 4.60% contradicting Economic agent's bearish assessment and validating sustained multi-hike cycle through Q3 2026 driving breakout above 0.7295-0.7320 toward 0.7400-0.7500 as market prices unprecedented 85-110bp policy inversion versus Fed easing trajectory Timeframe: 3-4 weeks through June 4 RBA decision as Economic agent's growth slowdown thesis either validates forcing dovish pivot or fails confirming hawkish cycle continuation
|
MACRO REGIME CLASSIFICATION: RISK-ON — VIX normalized to 17.39 on May 7 (well below 20 threshold), equities stable, credit conditions benign, USD consolidating after March weakness, creating supportive backdrop for commodity currencies. The Australian Dollar stands at a critical inflection point on May 10, 2026, trading at 0.7245 near 4-year highs following the most significant fundamental conflict in months. Post-input development identified: The RBA delivered a widely-expected 25bp hike to 4.35% on May 5 (5 days ago), the third consecutive increase, creating an unprecedented 60-85bp policy inversion versus the Fed at 3.50-3.75%.
However, the Economic agent has FLIPPED dramatically from +2.5 bullish signal last week to -2.5 bearish this week — a 5-point reversal representing the sharpest directional shift in the 12-week synthesis history. The agent explicitly cites the RBA's own Statement on Monetary Policy (May 2026) warning that the May 5 hike would 'intensify cost-of-living pressures and slow the economy further' despite existing capacity pressures. This creates a fundamental paradox: the RBA is tightening policy while simultaneously forecasting that tightening will create economic pain and growth slowdown.
The vote split was not disclosed but the bearish economic assessment suggests internal dissent may be building. Current consecutive same-direction bias streak: 0 weeks (last was NO CALL). Last 4 graded weeks: NO CALL MISSED (+0.73%), BULLISH MISSED (-0.29%), BULLISH CORRECT (+1.71%), BULLISH CORRECT (+2.34%). Current consecutive miss streak: 2 (NO CALL missed, BULLISH missed prior). Miss Reset After threshold is 3 for FX_MAJOR, so reset NOT triggered but elevated caution mandatory per Rule 5. FX_MAJOR BEHAVIOURAL OVERRIDE APPLIED: My default assumption is NEUTRAL for FX pairs which mean-revert on weekly timeframes.
The May 5 RBA hike occurred 5 days ago — this is a FRESH monetary policy catalyst per FX_MAJOR requirements. However, the Economic agent's bearish flip based on the RBA's own growth slowdown warning creates a conflicting narrative that undermines the policy divergence bullish case. The structural policy divergence at 4.35% versus 3.50-3.75% remains in place (60-85bp inversion), but if the RBA's own assessment is that this hike creates economic pain requiring pause or reversal, the divergence advantage is time-limited rather than sustained.
Institutional positioning at 78.7K net longs (up 9.5% week-over-week) confirms trend-following accumulation but approaches the 75th-80th percentile range creating elevated profit-taking vulnerability. Technical structure shows price at 0.7245 above all major moving averages with RSI 53.71 neutral, but immediate resistance at 0.7295-0.7320 requires fresh catalyst for breakout. The June 4 RBA meeting (25 days ahead) emerges as the next critical binary catalyst that will either validate the Economic agent's bearish growth slowdown thesis (forcing dovish pause/cut) or contradict it (confirming sustained hawkish cycle).
Signal calculation: Economic -2.5 × 0.30 = -0.75, Fundamental 1.5 × 0.25 = 0.375, Institutional 2.5 × 0.20 = 0.50, Technical 2.0 × 0.15 = 0.30, Sentiment 0.5 × 0.05 = 0.025, Options -0.5 × 0.05 = -0.025. Total signal = 0.425. However, this falls BELOW the Min Signal threshold of 1.1 for FX_MAJOR per RULE 2, requiring NO CALL or NEUTRAL output. Given the fundamental conflict between policy divergence (bullish) and RBA's own growth slowdown warning (bearish), combined with extended positioning at 4-year highs and 2-consecutive-miss streak degrading thesis health, the balance of probabilities favors NEUTRAL awaiting June 4 RBA clarity.
Conviction sequence: Initial 5 (conflicting signals create low conviction environment), minus 1 for last graded call MISSED (NO CALL at +0.73%), minus 0 for vol regime normal, minus 0 for no major catalyst penalty (May 5 hike 5 days old qualifies), minus 0 for macro regime supportive (risk-on favors AUD but economic conflict offsets). Final conviction 4, which falls BELOW minimum 5 threshold per Rule 3. Applying Rule 4 Thesis Health Score: Of last 4 graded weeks, price moved contrary to potential bullish bias 1 time (April 24 -0.29%), subtracting 0.5.
Net 4-week move is +2.15% favorable to bullish bias, no additional subtraction. However, the dramatic Economic agent flip from +2.5 to -2.5 represents new information NOT priced into prior bullish thesis creating empirical evidence of narrative shift. Thesis Health Score would be 4-0.5 = 3.5, well below 5 threshold, confirming NO CALL is appropriate per Rule 4. The FX_MAJOR behavioral override mandates that I default to NEUTRAL when the thesis relies on structural themes (policy divergence) that may be time-limited (RBA's own warning of economic slowdown) rather than sustained catalysts.
Current 0.7245 pricing at 4-year highs reflects full pricing of the May 5 hike but NOT the RBA's dovish growth warning embedded in the same statement. Market appears positioned for continued policy divergence without appreciating the RBA's explicit acknowledgment that further tightening may be self-defeating if growth slows materially. The balance of probabilities favors consolidation between 0.71-0.7295 over next 3-4 weeks awaiting June 4 RBA decision to resolve the fundamental conflict between hawkish action (4.35% rate) and dovish forward guidance (economic pain warning).
| Week | Bias | Confidence | Result |
|---|---|---|---|
| May 1, 2026 | NO CALL | 5/10 | ➖ |
| April 24, 2026 | BULLISH | 6/10 | ❌ |
| April 17, 2026 | BULLISH | 7/10 | ✅ |
| April 10, 2026 | BULLISH | 7/10 | ✅ |
| April 3, 2026 | NO CALL | 5/10 | ➖ |
| March 27, 2026 | NO CALL | 5/10 | ➖ |
| March 20, 2026 | BULLISH | 7/10 | ❌ |
| March 14, 2026 | NO CALL | 5/10 | ➖ |
| March 6, 2026 | BULLISH | 6/10 | ❌ |
| February 27, 2026 | BULLISH | 6/10 | ✅ |
| February 21, 2026 | BULLISH | 7/10 | ✅ |
| February 13, 2026 | BULLISH | 7/10 | ✅ |
📋 PROMPT-READY CONTEXT
Copy this entire block into any AI chat for follow-up analysis
▼ Expand
MACRO AGENT DESK — WEEKLY INTELLIGENCE BRIEFING
═════════════════════════════════════════════════
Asset: AUD/USD (6A)
Report Date: May 10, 2026

���─ DIRECTIONAL BIAS ─────────────────────────────
Call: NO CALL
Confidence: 5/10
Signal: NO DIRECTIONAL CALL THIS WEEK
MAD Index: 22 (MOSTLY ALIGNED)

── MARKET CONTEXT ───────────────────────────────
State: CONSOLIDATING AFTER FRESH CATALYST
Regime: CONSOLIDATING AT MULTI-YEAR HIGHS WITH CONFLICTING FUNDAMENTAL NARRATIVES
Sentiment: NEUTRAL

── WHAT THE MARKET SEES ─────────────────────────
Market consensus shifted from aggressive bullish expecting continued RBA tightening to cautious neutral recognizing May 5 hike created conflicting narrative with RBA's own growth slowdown warning tempering conviction for sustained policy divergence

── WHAT THE MARKET IS MISSING ───────────────────
NO CALL issued per Rule 2 (signal 0.425 below Min Signal threshold of 1.1 for FX_MAJOR) and Rule 4 (Thesis Health Score degraded to 3.5 after 2 consecutive misses and Economic agent's dramatic bearish flip). Market appears under-appreciating the significance of RBA's explicit warning that May 5 hike would intensify cost-of-living pressures and slow economy — this embedded dovish guidance contradicts the bullish policy divergence narrative and suggests June 4 pause more likely than fourth consecutive hike, creating asymmetric downside risk from extended 78.7K net long positioning at 4-year highs if RBA validates Economic agent's bearish assessment.

── KEY DRIVERS ──────────────────────────────────
1. RBA delivered third consecutive 25bp hike to 4.35% on May 5 (5 days ago) but Economic agent flipped bearish at -2.5 signal citing explicit RBA warning that hike would intensify cost-of-living pressures and slow economy creating conflicting narrative versus policy divergence tailwinds
2. Institutional positioning surged to 78.7K net longs (up 9.5% week-over-week) confirming trend-following accumulation but now at elevated levels approaching 75th-80th percentile creating latent profit-taking vulnerability after 620bp rally from November lows
3. AUD trading at 4-year highs near 0.7245 on May 8 following peace deal optimism creating extended positioning combined with 2-consecutive-miss streak (NO CALL missed at +0.73%, BULLISH missed at -0.29%) requiring caution per Rule 4 Thesis Health degradation

── KEY ZONES ────────────────────────────────────
Resistance 2: 0.7330 – 0.7370
Resistance 1: 0.7275 – 0.7315
Pivot: ~0.7245
Support 1: 0.7080 – 0.7120
Support 2: 0.6930 – 0.6970

── DISCIPLINE BIASES ────────────────────────────
Technical: BULLISH
Fundamental: BULLISH
Institutional: BULLISH
Options: BEARISH
Economic: BEARISH
Sentiment: NO CALL

── TECHNICAL STRUCTURE ──────────────────────────
Trading at 0.7245 (4-year high May 8) above 50-day MA at 0.7198 and 200-day MA at 0.6843 in bullish alignment with RSI 53.71 neutral but immediate resistance at 0.7295-0.7320 requiring fresh catalyst for breakout

── FUNDAMENTAL ASSESSMENT ───────────────────────
Policy divergence intact with RBA at 4.35% after May 5 hike versus Fed at 3.50-3.75% creating 60-85bp inversion but RBA explicitly warned hike would intensify cost-of-living pressures and slow economy materially contradicting bullish policy narrative

── INSTITUTIONAL POSITIONING ────────────────────
Net longs at 78.7K contracts up 9.5% from prior 71.9K representing third consecutive week of accumulation but positioning likely at 75th-80th percentile approaching elevated territory creating profit-taking risk if RBA narrative shifts dovish

── OPTIONS FLOW ─────────────────────────────────
Implied volatility at 9.45-10.1% slightly elevated above normal 7-9% range with mild put skew indicating defensive positioning but thin 6A options liquidity limits analytical value providing weak directional signal

── ECONOMIC BACKDROP ────────────────────────────
RISK-ON macro regime with VIX at 17.39 on May 7 (well below 20 threshold) confirming benign volatility but Economic agent's dramatic flip to -2.5 bearish signal citing RBA's acknowledgment that May 5 hike creates growth slowdown risk despite policy divergence advantage creates fundamental conflict

── VOLATILITY REGIME ────────────────────────────
Regime: NORMAL
Percentile: 52nd
Trend: Stable —
Days in Regime: 22
Term Structure: normal with short-term slightly below medium-term after normalizing from March elevated regime creating stable 60-70bp daily range environment
Historical Pattern: High volatility regimes around RBA meetings typically persist 20-30 days then revert sharply to baseline; current normalization at day 5 since May 5 RBA hike suggests stable consolidation through June 4 before potential catalyst-driven volatility expansion
Outlook: Moderate 65% probability volatility continues normalizing toward 48th percentile over next 10-14 days as May RBA binary catalyst digests, expect stable 60-70bp daily ranges before potential June 4 RBA catalyst spike if policy surprise delivered
Trading Context: Normalizing volatility at 52nd percentile suggests 60-70bp daily ranges versus March's 100-150bp creating stable directional environment; breakout above 0.7295 or breakdown below 0.71 requires sustained follow-through in current vol regime providing clearer conviction signals
Vol Risk/Opportunity: Volatility compression from March elevated regime to current 52nd percentile reduces tail risk but June 4 RBA could trigger 100-150bp move within 24-48 hours if dovish pause surprises current modest hawkish expectations or if fourth hike delivered contrary to Economic agent's bearish assessment; expect 150-200bp range through June versus 300-400bp in March geopolitical period with measured environment favoring consolidation ahead of binary RBA catalyst

── PRIMARY RISK ─────────────────────────────────
Economic agent's bearish flip based on RBA's explicit warning that May 5 hike would intensify cost-of-living pressures and slow economy proves correct triggering June 4 dovish pause or cut from current 4.35% collapsing entire policy divergence thesis and forcing violent unwind from extended 78.7K net long positioning at 4-year highs
Probability: MEDIUM

── PRIMARY OPPORTUNITY ──────────────────────────
June 4 RBA delivers fourth consecutive hike to 4.60% contradicting Economic agent's bearish assessment and validating sustained multi-hike cycle through Q3 2026 driving breakout above 0.7295-0.7320 toward 0.7400-0.7500 as market prices unprecedented 85-110bp policy inversion versus Fed easing trajectory
Timeframe: 3-4 weeks through June 4 RBA decision as Economic agent's growth slowdown thesis either validates forcing dovish pivot or fails confirming hawkish cycle continuation

── NEXT CATALYST ────────────────────────────────
Date: June 4, 2026
Event: RBA June 3-4 Monetary Policy Decision announced June 4 at 2:30pm AEST - critical binary catalyst determining whether May 5 hike was final tightening move or mid-cycle adjustment with markets pricing modest hold probability but RBA's explicit warning of economic pain from May hike suggesting pause likely
Expected Impact: HIGH

═════════════════════════════════════════════════
Source: Macro Agent Desk (macroagentdesk.com)
═════════════════════════════════════════════════

── FULL ANALYSIS ────────────────────────────────
MACRO REGIME CLASSIFICATION: RISK-ON — VIX normalized to 17.39 on May 7 (well below 20 threshold), equities stable, credit conditions benign, USD consolidating after March weakness, creating supportive backdrop for commodity currencies. The Australian Dollar stands at a critical inflection point on May 10, 2026, trading at 0.7245 near 4-year highs following the most significant fundamental conflict in months. Post-input development identified: The RBA delivered a widely-expected 25bp hike to 4.35% on May 5 (5 days ago), the third consecutive increase, creating an unprecedented 60-85bp policy inversion versus the Fed at 3.50-3.75%. However, the Economic agent has FLIPPED dramatically from +2.5 bullish signal last week to -2.5 bearish this week — a 5-point reversal representing the sharpest directional shift in the 12-week synthesis history. The agent explicitly cites the RBA's own Statement on Monetary Policy (May 2026) warning that the May 5 hike would 'intensify cost-of-living pressures and slow the economy further' despite existing capacity pressures. This creates a fundamental paradox: the RBA is tightening policy while simultaneously forecasting that tightening will create economic pain and growth slowdown. The vote split was not disclosed but the bearish economic assessment suggests internal dissent may be building. Current consecutive same-direction bias streak: 0 weeks (last was NO CALL). Last 4 graded weeks: NO CALL MISSED (+0.73%), BULLISH MISSED (-0.29%), BULLISH CORRECT (+1.71%), BULLISH CORRECT (+2.34%). Current consecutive miss streak: 2 (NO CALL missed, BULLISH missed prior). Miss Reset After threshold is 3 for FX_MAJOR, so reset NOT triggered but elevated caution mandatory per Rule 5. FX_MAJOR BEHAVIOURAL OVERRIDE APPLIED: My default assumption is NEUTRAL for FX pairs which mean-revert on weekly timeframes. The May 5 RBA hike occurred 5 days ago — this is a FRESH monetary policy catalyst per FX_MAJOR requirements. However, the Economic agent's bearish flip based on the RBA's own growth slowdown warning creates a conflicting narrative that undermines the policy divergence bullish case. The structural policy divergence at 4.35% versus 3.50-3.75% remains in place (60-85bp inversion), but if the RBA's own assessment is that this hike creates economic pain requiring pause or reversal, the divergence advantage is time-limited rather than sustained. Institutional positioning at 78.7K net longs (up 9.5% week-over-week) confirms trend-following accumulation but approaches the 75th-80th percentile range creating elevated profit-taking vulnerability. Technical structure shows price at 0.7245 above all major moving averages with RSI 53.71 neutral, but immediate resistance at 0.7295-0.7320 requires fresh catalyst for breakout. The June 4 RBA meeting (25 days ahead) emerges as the next critical binary catalyst that will either validate the Economic agent's bearish growth slowdown thesis (forcing dovish pause/cut) or contradict it (confirming sustained hawkish cycle). Signal calculation: Economic -2.5 × 0.30 = -0.75, Fundamental 1.5 × 0.25 = 0.375, Institutional 2.5 × 0.20 = 0.50, Technical 2.0 × 0.15 = 0.30, Sentiment 0.5 × 0.05 = 0.025, Options -0.5 × 0.05 = -0.025. Total signal = 0.425. However, this falls BELOW the Min Signal threshold of 1.1 for FX_MAJOR per RULE 2, requiring NO CALL or NEUTRAL output. Given the fundamental conflict between policy divergence (bullish) and RBA's own growth slowdown warning (bearish), combined with extended positioning at 4-year highs and 2-consecutive-miss streak degrading thesis health, the balance of probabilities favors NEUTRAL awaiting June 4 RBA clarity. Conviction sequence: Initial 5 (conflicting signals create low conviction environment), minus 1 for last graded call MISSED (NO CALL at +0.73%), minus 0 for vol regime normal, minus 0 for no major catalyst penalty (May 5 hike 5 days old qualifies), minus 0 for macro regime supportive (risk-on favors AUD but economic conflict offsets). Final conviction 4, which falls BELOW minimum 5 threshold per Rule 3. Applying Rule 4 Thesis Health Score: Of last 4 graded weeks, price moved contrary to potential bullish bias 1 time (April 24 -0.29%), subtracting 0.5. Net 4-week move is +2.15% favorable to bullish bias, no additional subtraction. However, the dramatic Economic agent flip from +2.5 to -2.5 represents new information NOT priced into prior bullish thesis creating empirical evidence of narrative shift. Thesis Health Score would be 4-0.5 = 3.5, well below 5 threshold, confirming NO CALL is appropriate per Rule 4. The FX_MAJOR behavioral override mandates that I default to NEUTRAL when the thesis relies on structural themes (policy divergence) that may be time-limited (RBA's own warning of economic slowdown) rather than sustained catalysts. Current 0.7245 pricing at 4-year highs reflects full pricing of the May 5 hike but NOT the RBA's dovish growth warning embedded in the same statement. Market appears positioned for continued policy divergence without appreciating the RBA's explicit acknowledgment that further tightening may be self-defeating if growth slows materially. The balance of probabilities favors consolidation between 0.71-0.7295 over next 3-4 weeks awaiting June 4 RBA decision to resolve the fundamental conflict between hawkish action (4.35% rate) and dovish forward guidance (economic pain warning).